If you own a website, you are probably wondering, “who is viewing my website” or “who is my website reaching”. Well, the answer to this is to use Google Analytics. In this blog we will go into detail about What is Google Analytics and how you can add it to your site. Attempting this task can be a bit technical so make sure you know what you are doing or contact your Web Developer. If you are looking for assistance and need some support, then please get in touch with us and one of our team will get back to you.
What is Google Analytics
Google Analytics is a free tool that allows you to analyse data from your business in one place allowing you to make smarter decisions. With this data you can understand your site and users more as you can check the performance of your marketing content, products, and more. All this information is useful as you should always be looking at ways to target audiences that you identify as your key customers. With Google Analytics you can see where your audience is coming from, what pages are being viewed the most, how long a user may stay on your site and much more.
Why is Google Analytics useful?
With your website your number 1 goal is to get more traffic, the more traffic that you have to your site means that there will be more people buying your product or getting in touch through phone or email.
One of the most useful tools that comes with Google Analytics is the audience tool which allows you to see where your audience is coming from, what browser they used, their screen resolution along with the time of day that they visit. This all allows you to ensure that your sites design is compatible with your audience allowing you to tailor it as much as possible by creating content that people will like.
Another useful tool that Google Analytics provides is that you can see what your audience is doing when they are on your website. You can track things like how long they are on your website or what is the bounce rate of your website (the number of your audience that leaves after the first visit). You are also able to find out what are some of your most clicked on pages, this is extremely useful if you are running a blog as you can identify what blogs have done well and which ones not so much.
How to get started with Google Analytics
First thing you need to do when using Google Analytics is to create an account or sign into a previous Google or Gmail account. The sign in process is simple and Google provides you with step-by-step instructions when attempting to create an account.
Once you have created or signed into your Google Account you then need to go to the Google Analytics page where you will be prompted with a sign in, using your Google or Gmail account to sign up for your Google Analytics account.
Step 1
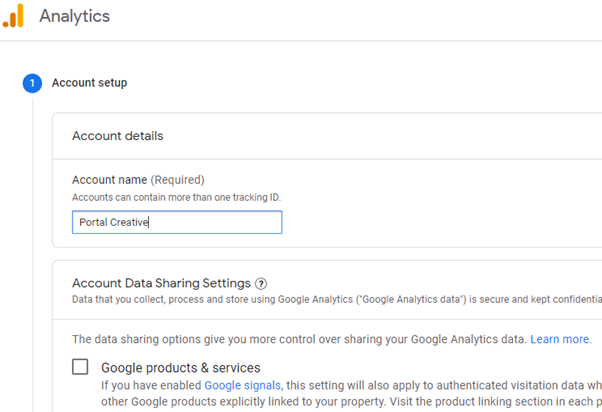
When you click Start Measuring you will then be able to start entering your details for your site. Here you can enter your Account name this can be anything you want but we recommend entering your business name e.g., Portal Creative.
Leaving the check boxes the way they are click on Next.
Step 2
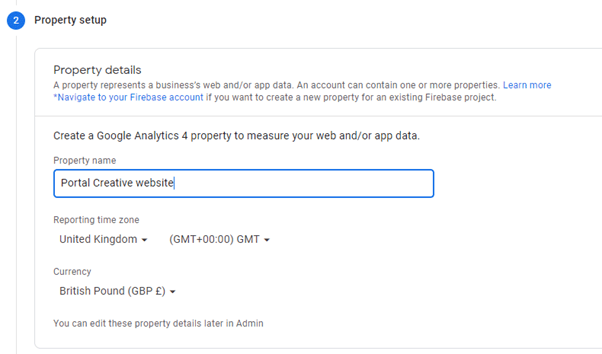
Enter a name for the property again this can be whatever you want but we recommend “Business Name” website e.g., Portal Creative website. Next you want to fill out your Reporting time zone along with the Currency you use. It is important to note that if someone visits your website on a Monday, but your time zone is on the Tuesday then that visit will be counted as from the Tuesday.
Step 3
You can fill out the business information with whatever relates to your business, once filled out click on Create. You will then be prompted with the Terms of Service Agreement, read through this clicking the check box, and then click I Accept. Once you have completed this you will be greeted with the Google Analytics Dashboard. You then want to click on Web from the Choose a platform section.
Step 4
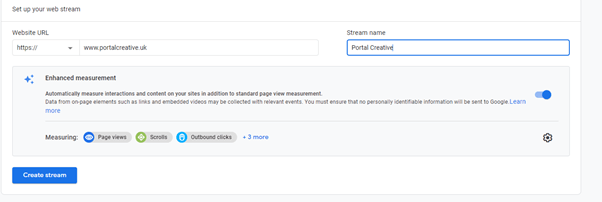
Enter your website URL along with what you want your stream name to be, this can be anything you want but we recommend entering your business name. Once filled out click on Create stream.
Step 5
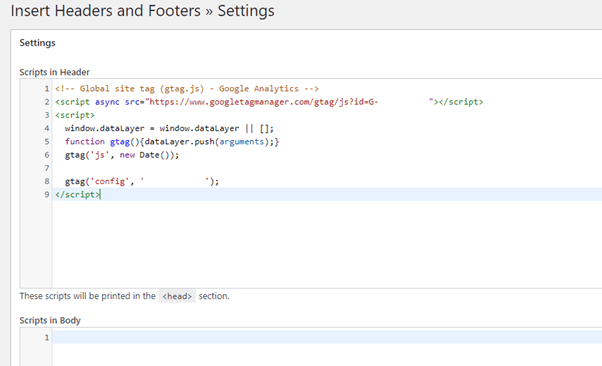
Now you will be presented with your Google Analytics tracking code, if you cannot find it, you’ll need to click on Global site tag under Add new on-page tag found in the Tagging Instructions section. Please note we have cropped out our site tag for privacy reasons in the screenshot below.
It is important that you keep this browser tab open as you may need to revisit it once you have applied it to your WordPress site. If you are working with a Web Developer, you will need to provide them with this tag so they can put it onto your site for you.
How to Install Google Analytics in WordPress
Now that you have setup your site in Google Analytics you now need to setup Google Analytics in WordPress, if you are working with a Web Developer, they will be able to do this part for you. Make sure you only choose one of the options as you don’t want to have a double tracking of page views giving you the wrong tracking information for your site.
Option 1. Insert Headers and Footers Plugin
This method requires you to install and activate a plugin called Insert Headers and Footers. This plugin basically does what it says in the name it allows you to add information into the header or footer of your site. When you have activated the plugin, you will need to navigate to the plugin in your WordPress Dashboard, it can be found in Settings > Insert Headers and Footers. Here you can then copy your Google Analytics tracking code into the Scripts in Header section.
Once pasted into the Scripts in Header section remember to click on the Save button, once saved you will have Google Analytics on your site.
Option 2. Install into WordPress Theme
Add via Functions File
If you add the Google Analytics tracking code to your WordPress functions file it will then automatically be added to every page on your WordPress site. To add this to your site you need to copy and paste the code below replacing the code on line 5 with your Google Analytics tracking code.
[php]
1 <?php
2 add_action('wp_head', 'wpb_add_googleanalytics');
3 function wpb_add_googleanalytics() { ?-->
4
5 // Paste your Google Analytics tracking code here
6
7 ?>
[/php]
Add into the header.php file
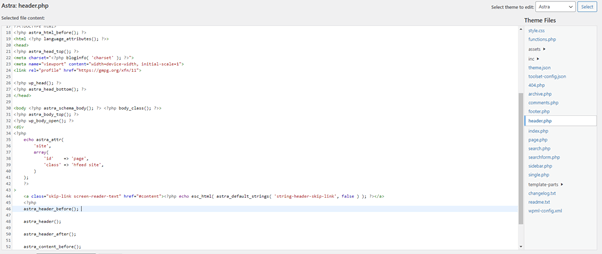
In your WordPress dashboard navigate to Appearance > Theme Editor. Click on Theme Header file on the right-hand side. Please note that we are using Astra theme as an example.
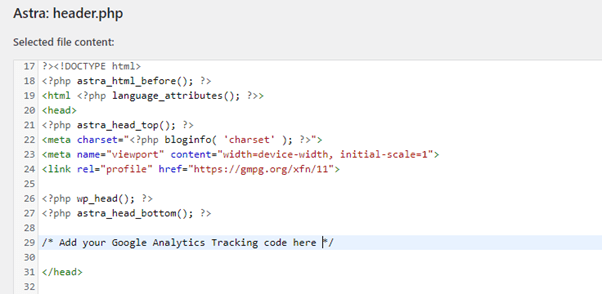
Paste the Google Analytics Tracking code just before the closing tag.
Click on Update File, your site should now have Google Analytics added to it.
Option 3. On your WordPress.com Site
For this method you will need to go back to Google Analytics and copy the measurement ID which can be found at the top of your web stream details. We have removed ours for security reasons.
Once you have this you then need to go to your WordPress.com Settings and navigate to Tools > Marketing > Traffic and scroll down until you find the Google Analytics section. You then paste your entire ID that you copied from Google Analytics site into the “Google Analytics Measurement ID” box. After you click Save Settings your site will be connected to Google Analytics and start sending data to Google.
How to use Google Analytics
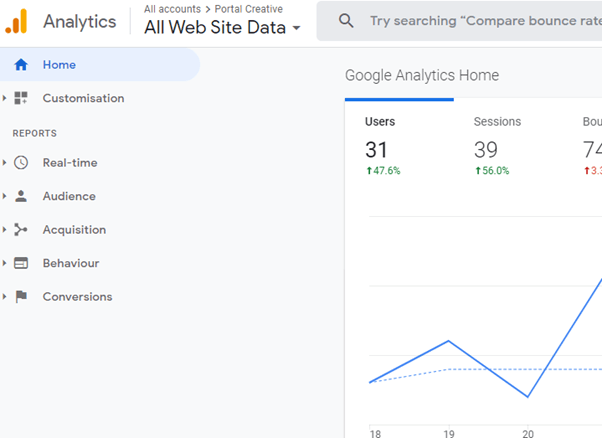
Going back to Google Analytics you should now be able to see your website data. You can navigate through the Google Analytics reports on the left-hand column with each tab expanding to show you more options.
Google Analytics is very useful at giving you information that can better improve your sites SEO rankings which in turn will get your site more traffic. We recommend using Google Search Console with Google Analytics to ensure you get the most out of your audience and website research. If you are looking to have Google Analytics added to your site and aren’t sure where to get started then please get in touch, one of our team would be happy to help. If you are looking for SEO services then please contact us so we can have a chat about your project.


